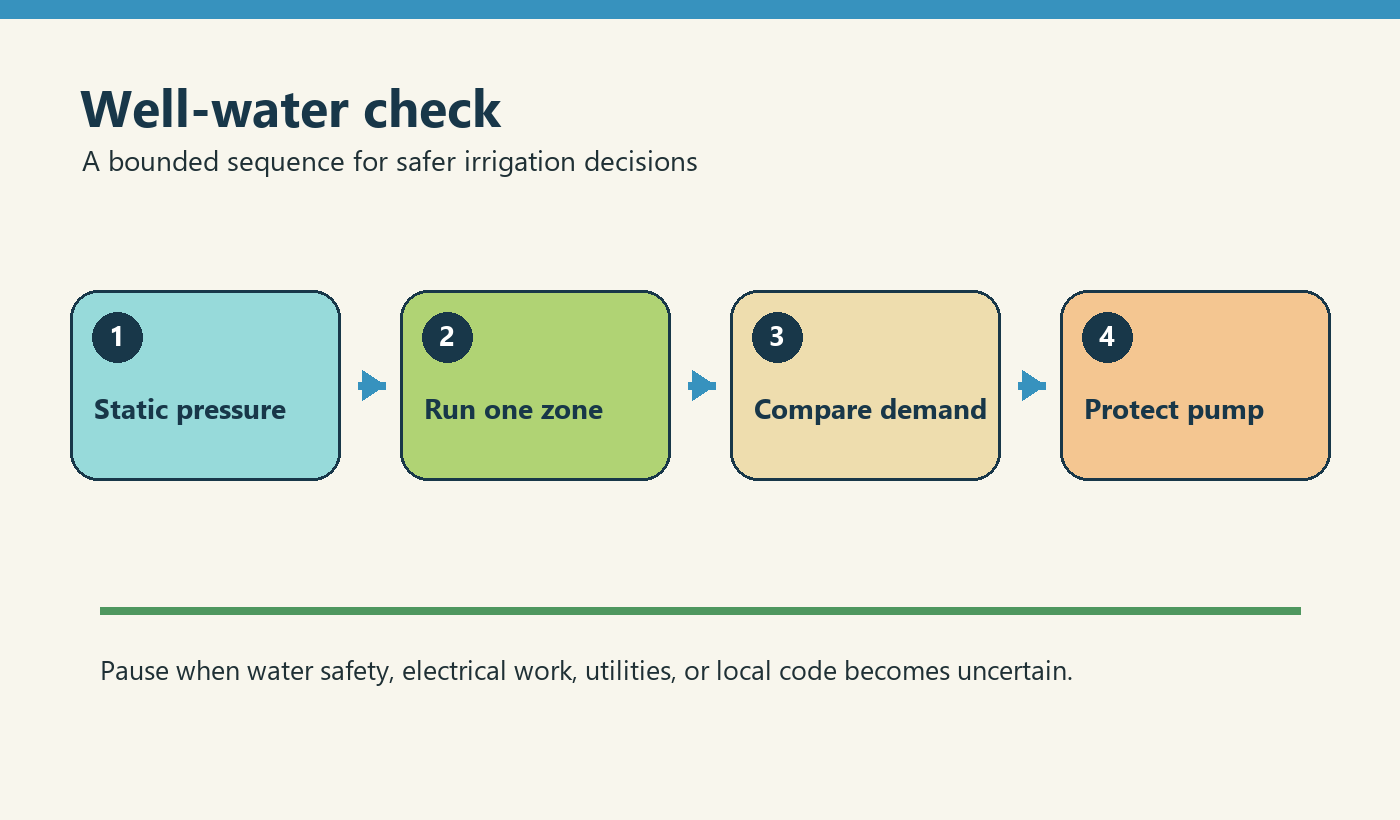

Well-water irrigation depends on both available flow and stable pressure. A bucket test alone is not enough if the pump, pressure tank, recovery rate, or household demand changes while a zone runs.
Measure under normal demand
Take a static pressure reading with irrigation off, then measure pressure while the intended zone operates. Record how long the pressure remains stable and whether the pump cycles rapidly, runs continuously, or loses pressure as the zone continues.
| Observation | Possible concern |
|---|---|
| Pressure is low on every zone | Pump, pressure tank, switch, main restriction, or simultaneous demand. |
| Pressure falls only at the far end | Pipe friction, elevation, leak, filter, or overloaded zone. |
| Pump cycles rapidly | Pressure-tank or pressure-switch issue; obtain qualified service. |
| Water contains sediment | Filter and source-water issue that may affect emitters. |
Design zones below the available capacity
Add the nozzle or emitter flow for one zone and compare it with measured available flow at a safe operating pressure. Do not design at the maximum result from a short test. Leave capacity for household needs and source variation.
Use pressure regulation, filtration, and properly sized pipe where needed. A larger pipe does not create more well output, but it can reduce friction loss on a long run.
Protect pump equipment
Do not let a pump run dry or continue operating through repeated pressure loss. Follow the pump manufacturer procedure for priming, electrical protection, and winterization. Call qualified pump or electrical service for overheating, breaker trips, burned odor, unstable pressure, or uncertain wiring.
Well-water checklist
- Measure static and running pressure at comparable times.
- Check flow, pump cycling, and pressure stability during a zone run.
- Keep zone demand below reliable available flow.
- Maintain filters and inspect water quality when clogging appears.
- Use qualified service for pump, pressure-switch, or electrical faults.
- Write the symptom and the affected zone or component before changing anything.
- Measure under normal operating conditions and compare representative locations.
- Make one controlled change and record the date, setting, or part used.
- Run a verification cycle and inspect both the source side and the far end.
- Pause for electrical, potable-water, utility, pressure, structural, or code uncertainty.
- U.S. EPA WaterSense: Watering Tips — practical guidance for efficient landscape watering.
- U.S. EPA WaterSense: WaterSense Labeled Controllers — context for weather-based and sensor-informed control.
- USDA NRCS: Irrigation Water Management — soil, water application, and management considerations.
- Penn State Extension: Drip Irrigation — drip-system layout, operation, and maintenance context.
- Irrigation Association: Backflow Prevention — general cross-connection and backflow-protection context.
What to verify for this topic
For this subject, begin with static pressure, running pressure, pump cycling, recovery rate, and zone demand. Those details determine whether the next step is a schedule adjustment, a cleaning or repair task, a design change, or a request for qualified service. Do not infer a cause from one visual clue. Compare the affected area with a normal area, and compare the start of the run with the far end when water travels through a line.
The safe boundary is to keep irrigation demand below the reliable capacity of the well and pump rather than designing from a brief peak-flow test. If the system cannot be isolated, the measurement cannot be trusted, or the proposed action would change a regulated connection, leave the equipment in a safe state and document the condition for the person who will complete the work.
Work through the decision in a repeatable order
The most useful way to apply this guidance is to separate observation, measurement, adjustment, and verification. Start by writing down the current symptom and the part of the system affected. Then identify the water source, the zone or component involved, and any recent change such as a repair, new planting, weather event, fertilizer application, or controller reset. This prevents a familiar-looking symptom from being treated with the wrong fix.
Use one controlled change at a time. If you change a nozzle, runtime, pressure setting, filter, sensor threshold, or pipe route, record the change before testing again. When several variables are changed together, it becomes difficult to tell whether the improvement came from the repair or whether a new problem was introduced. A short written record is usually enough: date, zone, starting condition, measurement, change made, and result.
| Stage | What to record | What a useful result looks like |
|---|---|---|
| Observe | Location, timing, weather, recent work, and affected plants or equipment | The symptom can be reproduced or described precisely |
| Measure | Pressure, flow, moisture, runtime, output, or equipment status as relevant | The measurement is taken at a comparable point each time |
| Adjust | One repair, setting, cleaning step, or schedule change | The change addresses a plausible cause, not only the visible symptom |
| Verify | Near and far points, startup and shutdown, and the next normal cycle | Water reaches the intended root zone without unsafe behavior or waste |
Use the field check before buying parts
Before replacing equipment, inspect the simplest causes that fit the symptom. Confirm that the correct valve, filter, sensor, controller program, shutoff, or power source is being tested. Look for leaks, clogged outlets, damaged insulation, unusual pressure change, runoff, standing water, or a setting that was changed during earlier work. A replacement part cannot correct an undersized zone, a blocked filter, a bad route, or a schedule that does not match the site.
For a meaningful comparison, test under normal operating conditions. A pressure reading with every zone closed may not describe the pressure while the zone is running. A soil check at the surface may not describe the moisture at root depth. An app status may not prove that a valve opened. Repeat the check at representative near, middle, and far points whenever the system has a long run or different elevations.
Know when to pause
Stop the work when water can reach a drinking-water line, when an electrical enclosure or pump circuit is wet or energized, when excavation reaches an unknown utility or obstruction, when a pressurized component cannot be isolated, or when a repair would require bypassing a safety device. Also pause when the proposed change could create runoff toward a building, road, drain, well, or neighboring property. Keep the system in its safest known state and obtain qualified local guidance where code, licensing, testing, or equipment instructions apply.
Keep a small maintenance record
Save the model numbers, zone names, photos, measurements, settings, repair dates, and next review date. Note what did not work as well as what did. This record helps a future technician start with evidence, supports seasonal adjustments, and makes it easier to notice a gradual decline in flow or coverage. Recheck the system after major weather, landscaping, water-source, controller, or equipment changes.
Practical close-out checklist
References
These sources provide general water-efficiency, irrigation-management, controller, drip-irrigation, and backflow context. Local plumbing, electrical, water-use, excavation, and landscape rules can be stricter; manufacturer instructions and the applicable local authority control the final decision.